

The right box size for your jewelry depends on its maximum dimensions, how it will be presented, the insert’s construction, clearance for safe handling, protection needs, and how the box fits your shipping and retail system. Generic standard sizes rarely cover all of these at once. Validate final dimensions with a physical sample before mass production.
You have seen it before. A batch of jewelry boxes arrives looking perfect on paper, then the rings slide inside their slots or the necklace chain tangles against the lining. The real problem is rarely the box itself. It is the gap between a spec sheet and the finished product, once the insert, lining, and closure all come together. Getting the size right means starting from the jewelry, not the box, and confirming every measurement with a sample before you commit to a production run. This guide walks you through exactly how to do that.
Choosing the right box is not just about fitting a product inside a container. It affects protection, presentation, shipping cost, and how confident a customer feels opening your package. Below, we walk through how to choose the right jewelry box size for your products, from measuring your jewelry and setting accurate jewelry box dimensions by type, to validating a custom jewelry box size with a sample before production.
Why Jewelry Box Size Matters More Than You Might Think
Getting jewelry packaging size wrong costs more than a bad first impression. It affects protection, material use, storage, shipping efficiency, and how the customer experiences your brand.
Too little space: Jewelry compresses against the insert, chains catch on lining, and stones risk scratching against the box wall.
Too much space: The product shifts during transit, packaging bulk increases, and freight and storage costs climb without adding any value.
A well-sized box protects the product, looks intentional on shelf or on camera, and keeps jewelry box sizing consistent across your catalog. See how these needs shift for jewelry boxes for retail display vs shipping.
Start With the Jewelry, Not the Box
The most common sizing mistake is picking a box first and hoping the product fits. Here’s how to measure jewelry for packaging correctly: let the jewelry set the specification, then build the box around it.
Before you size anything, confirm:
- Maximum length, width, and height, including stones, settings, clasps, and charms
- Chain volume and any elements that stick out from the main body
- The presentation orientation you want the customer to see first
Getting your jewelry packaging dimensions right starts here. Our custom jewelry box design and packaging engineering process starts from these product measurements before any box drawing begins.
Measure the Maximum Product Dimensions
Start by capturing accurate jewelry dimensions for packaging: measure the widest, longest, and highest points of the piece. Include stones, prongs, clasps, and any charm or pendant drop. If you skip a protruding element, the box will look right on paper and fail in the sample stage.
Decide How the Jewelry Should Be Positioned
Decide whether the piece will sit flat, stand upright, hang suspended, sit wrapped, or slot into a fixed channel. Orientation is a core part of jewelry box product fit, since it changes the internal dimensions you need. A necklace displayed hanging needs more depth than one laid flat in a tray.
Recommended Box Sizing Considerations by Jewelry Type
There is no single standard size that works for every jewelry category, which is exactly what this jewelry packaging size guide is here to help with. Each product type has its own priorities when it comes to jewelry box sizes by jewelry type.
| Jewelry type | Key sizing factors |
| Rings | Ring diameter, band width, stone height, insert slot depth, closure clearance |
| Earrings | Stud, hoop, or drop style, spacing, posts, hooks, backing mechanism |
| Necklaces & pendants | Pendant size, chain volume, chain channels, anti-tangle positioning |
| Bracelets & bangles | Flexible vs rigid form, diameter, width, thickness, presentation angle |
| Jewelry sets | Compartment layout, spacing between pieces, overall visual balance |
For a deeper breakdown by category, see our custom jewelry boxes by jewelry type.
Ring Boxes
Getting ring box dimensions right means paying close attention to band width, stone or setting height, and insert slot depth, the core of ring packaging size. A slot cut too shallow lets the ring rock and rub against the insert wall in transit, scuffing the band; one cut too deep lets it flip and settle at an odd angle, which looks careless the moment the lid opens. Engagement rings and statement designs often need custom slot dimensions rather than a stock ring cushion.
Earring Boxes
Earring box dimensions shift depending on style: studs, hoops, drops, and statement earrings all sit differently. Consider post length, hook drop, backing mechanism, and how the pair will be spaced so they do not touch or tangle.
Necklace & Pendant Boxes
Necklace box dimensions hinge on one variable most brands underestimate: chain volume. Getting pendant box size right also means building in a chain channel, hook, or elastic tab that keeps the chain positioned and prevents tangling during transit.
Bracelet & Bangle Boxes
Bracelet box dimensions need to account for flexible bracelets versus rigid bangles or cuffs, which call for different internal shapes. Getting bangle box size right also means measuring diameter, width, and thickness, and deciding whether the piece sits flat or stands on its edge.
Jewelry Set Boxes
Jewelry set box dimensions need planned compartments with enough spacing to keep each piece separate. Balance protection against making the box larger than it needs to be.
3 Custom Jewelry Box Options to Consider
Once you understand sizing by jewelry type, here are three practical custom jewelry boxes to consider, each available as one of our custom size jewelry boxes built around your product line. We customize dimensions, structure, inserts, materials, finishes, colors, and branding on each one to match your product line. See more formats in our guide to jewelry packaging box types.
1. Compact Jewelry Box for Rings & Earrings
The Tricolor Options Round Velvet Jewelry Box works well as custom ring boxes and custom earring boxes for small pieces. At 100 × 90 × 50mm, its rounded velvet shell holds a fitted insert that keeps small pieces secure in a small footprint, and it comes in red, green, or magenta with OEM customization on color, size, and interior structure.

2. Medium Jewelry Box for Bracelets & Pendants
The Dome-Style Premium Suede Jewelry Box Series functions as custom bracelet boxes and custom pendant boxes, with a pendant box at 10 × 10 × 4.5cm, a bracelet box at 9.8 × 9.8 × 4.5cm, and a long bracelet format at 24 × 5.7 × 3.5cm. The full-suede interior cushions the piece without adding bulk, and the range covers rings and earrings too if you want one coordinated collection.
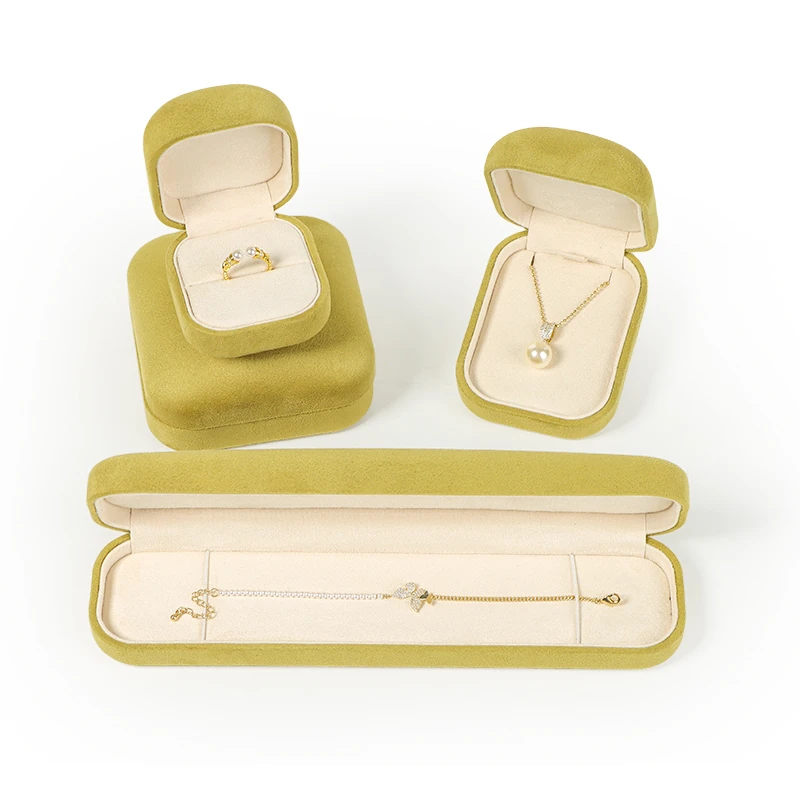
3. Large Jewelry Box for Necklaces & Jewelry Sets
The Forest Green Jewelry Drawer Box with Suede Lining works well as custom necklace boxes and jewelry set boxes for statement pieces and multi-piece collections. Its 3-in-1 format runs 18 × 18 × 6.3cm, large enough for compartment layouts and chain management, and the pull-out drawer structure adds spacing between pieces so a full set presents clearly rather than crowding one insert.

The Insert Changes the Usable Size of Your Jewelry Box
Getting jewelry box insert size right means recognizing that jewelry box internal dimensions and external dimensions are not the same thing. Inserts, lining, padding, platforms, and compartments all reduce or reshape the usable interior.
Internal Dimensions vs. External Dimensions
Wall thickness, structural lining, padding, and insert construction all eat into internal jewelry box dimensions. Rigid board needs a double-wall construction to hold its shape, and the lining sits inside that again, so a box that measures 8cm on the outside might offer closer to 7cm of real usable width once the insert is in place.
Allow Enough Clearance Without Creating Excess Movement
Jewelry packaging clearance needs to allow safe placement and removal, while letting the insert hold the piece securely in position. Clearance needs vary by jewelry geometry and insert design, so avoid applying one fixed measurement across every product.
Should You Use One Box Size for Multiple Jewelry Products?
Minimum order quantities differ by material: cardboard boxes start at 1,000 pieces per size, while wood, velvet, and leather boxes start at 500. That’s part of why using standard jewelry box sizes, or one box size for multiple products, can simplify procurement and inventory — tooling and die-cutting costs are largely fixed no matter the order size, so spreading that fixed cost across a shared size lowers your per-unit price, until the box no longer fits the product, at which point you are paying to ship wasted space instead. Weigh both sides before deciding. See what affects custom jewelry box cost for how sizing choices affect per-unit price.
When Standardizing Box Sizes Makes Sense
If several products share a similar footprint, one external box size with different inserts supports standardized jewelry packaging without losing individual fit. This works well for related items within the same category, such as a stud earring line with several designs.
When a Custom Size Is the Better Choice
Unusual shapes, statement pieces, premium collections, and sets with specific protection needs usually call for custom size jewelry boxes rather than a standard template. Compare the trade-offs in custom jewelry boxes vs stock boxes.
Balance Product Fit With Brand Presentation
A true jewelry presentation box is about more than fit: it’s part of your custom jewelry packaging design. The smallest box that physically fits the jewelry is not always the right choice. Peer-reviewed packaging design research links visual and structural packaging choices to purchase intention and brand experience, not just to product protection. Consider:
- Proportions and negative space around the piece
- The opening experience as the customer lifts the lid
- Logo visibility and presentation hierarchy
- Consistency with the rest of your packaging range
Getting these details right is what starts to create a luxury jewelry unboxing experience with custom packaging, well before the box ever reaches a customer’s hands.
Consider Shipping, Storage & Retail Display Before Finalizing Dimensions
Jewelry packaging shipping needs ripple out from the same jewelry box packaging dimensions you set earlier. Before you lock in a size, check how it affects:
- Master carton fit and freight volume
- Warehouse storage space
- Retail display fixtures
- Shopping bags and mailers
- Any secondary protective packaging
A rigid box holds its shape well on a retail shelf, but that same rigidity adds bulk that a foldable or slimmer structure would ship for less. Match the structure to the channel it is actually going through, not just the one it looks best in.
A size that looks efficient on its own can create waste once it moves through your full supply chain. Major carriers such as UPS calculate shipping costs using dimensional weight, calculated as length × width × height divided by a carrier-set divisor. So an oversized box can raise freight costs even when the jewelry inside is light. Carriers have converged on this method: USPS applies the same divisor, 139, as UPS and FedEx once a package exceeds 1 cubic foot. So an oversized box triggers the same DIM-weight penalty across every major carrier, not just one.
Why Sampling Is Essential Before Mass Production
A drawing can look correct and still perform differently once the box, jewelry, insert, lining, hinges, and closure are all assembled together. This is why the International Safe Transit Association designs lab tests, including its ISTA 3A procedure for parcel-delivery shipments, that simulate real shocks, drops, and handling, rather than relying on a spec sheet alone. That is why we recommend testing every custom order with a jewelry box sample, a custom jewelry packaging sample, before bulk production. Sample development typically takes 7 to 15 days, a small window against the 30 to 45 days a full production run takes once it starts. Catching an insert-fit problem at the sample stage costs you one box; catching the same problem after a full run, whether 500 or 1,000 pieces depending on the material, costs you the entire batch and another 30 to 45 days to remake it. Learn more about our full process in jewelry packaging sampling and production lead time.
What to Check During Sample Approval
Jewelry packaging sample approval should confirm the following before you sign off:
- Ease of insertion and removal
- Whether the jewelry moves or shifts inside the box
- Any compression against the insert
- Closure clearance
- Insert stability
- Visual centering and branding placement
- Overall presentation
Common Jewelry Box Sizing Mistakes to Avoid
Most jewelry box sizing mistakes trace back to a handful of repeats:
- Measuring only length and width, and ignoring height
- Confusing internal dimensions with external dimensions
- Forgetting to account for insert thickness
- Leaving excessive empty space around the product
- Poor chain management for necklaces and pendants
- Approving dimensions without testing a physical sample
Avoid these and you sidestep most of the risk before you place a bulk order. This is exactly where common mistakes when ordering custom jewelry boxes tend to show up.
What Information Should You Send a Jewelry Box Manufacturer?
A clear brief speeds up your quote and reduces back-and-forth with any custom jewelry box manufacturer. Treat this list as your jewelry packaging RFQ checklist. Send your manufacturer:
- Jewelry type and exact dimensions
- Product photos or drawings
- Desired presentation style
- Preferred box structure
- Insert requirements
- Materials and colors
- Logo placement and finish
- Order quantity
- Shipping and display constraints
A brief this complete is essentially how to source custom jewelry packaging for your jewelry brand, without the extra rounds of back-and-forth.
Getting jewelry box size right starts with the product, not the box. Measure the maximum dimensions, decide on presentation, account for the insert’s impact on usable space, and confirm everything with a physical sample before production. Skip that last step and even a well-planned box can fail once it comes together in the real world.
Develop the Right Jewelry Box Size With ROMI Packing
Backed by 19+ years of manufacturing experience, a 5,000 m² factory, and production quality-controlled to ISO 9001 standards, we work with jewelry brands, retailers, and distributors to translate your product dimensions and presentation goals into a production-ready box, insert, and sample. Not ready for a full quote yet? Start with a sizing sample and confirm the fit before committing to a production run. As your custom jewelry box manufacturer, if you are ready to move forward, request a quote for custom jewelry boxes and our team will guide you through sizing, materials, and sample development from there. You can also explore our full jewelry boxes range to see what is possible.

